- Published on
6 Tips To Create The Perfect User Onboarding Checklist
- Authors

- Name
- Tirth Gajjar
- @tirthgajjar4
If they have visited your product, this means they are interested. And if they are interested, it’s your duty to keep them engaged.
Customer engagement is an important goal of everyone who has a product out there. Customer engagement is only possible if your customer is well versed with your product. Which is why Onboarding becomes a crucial task at hand.
What is Onboarding?
The first time a customer visits your product is called Onboarding. It is vital for every customer to have a good Onboarding experience to stay connected with the product. 55% of people say they've returned a product because they didn't understand how to use it. Such experiences can prove to be bad for your product.
If you don’t want your customer to close your product or label it as ‘hard to understand’, make sure you are ready with your Onboarding checklist.
An Onboarding checklist is just like any other checklist. But before moving on to it, think about all those times a checklist or a to-do list has made things easier for you. Do you end up completing all your tasks by the end of the day if you have made a to-do list? Well, psychology proves this. And yes, making a to-do list helps you stay all the way through.
Now let’s apply the same theory to our products. An Onboarding checklist helps your customer to know your product better. It’s like those arrow signs on the floor of Ikea which guides you everywhere. Except, it’s highly customizable.
Onboarding checklist is a great way to ensure customer activation and user engagement. Not to forget, it provides hands-on-training.
Let us look at these 6 tips which will help you make an efficient Onboarding checklist.
Reflect your product.
Create an Onboarding experience which reflects your product. Try to add your brand’s personality into your Onboarding experience if possible. This will give your customers a comprehensive experience.
Relating your product to your checklist is the first step towards making a checklist. In the next step, you will choose what type of checklist you want. But before moving on to that, list down what you want to achieve from that checklist?
- Do you want to give a tour of your product?
- Do you want to dive into details about the product?
- Do you want to customize customer experience through an interactive checklist?
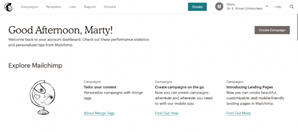
Look how Mailchamp reflects its brand through its checklist. Pay close attention at the font, format and how it reflects their brand personality. Also, they are pretty straightforward that they want the customer to explore the tool.
Choose your type.
Once you’ve decide your goal behind the checklist, the next step is to decide what type of checklist goes the best with your brand.
Here are some types you can refer:
Visual tutorial checklist : In this checklist, each step opens up to a video tutorial of a feature of the product. 97% of people believe video is an effective tool to welcome and educate new customers. This gives an option to the user to complete all the steps at once or come back if they need any guidance. Each step is named and hence it provides a constant support to the user.
Visual tutorial checklist
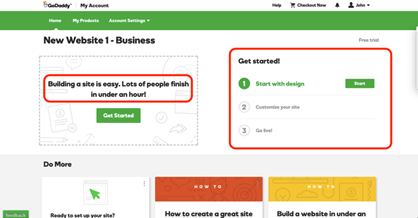
Step-wise-Step tutorial: If your product involves 3-4 steps, this is your way to go. Let’s take an example of GoDaddy which teaches the user to design and publish within three easy steps. These three easy steps cover the main use of the product.
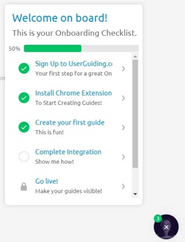
Quick wins : This type of checklist gives a mental satisfaction to the customer when accompanied by a slider that shows progress. Quick wins checklist involves easy steps like- turn on post notifications, confirm your mail-id, put a profile picture or create your first project. These are very commonly seen and are done very quickly.
Tip: Striking off the first task (eg-Sign up) creates a psychological effect of wanting to strike off more. So make sure you keep the first task something very basic and easy.
Incentive based: This was previously seen in gaming products but is now adapted by many other non-gaming products as well. This checklist provides the user with an incentive as soon as they complete a task. This can be in the form of badges or coins or messages that say, “Hurray! You’ve unlocked this new feature.” This was used by Snapchat where they unlocked geofilters after the user successfully turns on their location.
Keep it simple.
The simpler the language, the better the experience. Checklists allow the user to learn something new and get involved with the product. Complicated use of words or symbols will confuse the customer thereby curbing the whole point. Don’t use fancy fonts or catchy colours because the customer is already at your doorstep. Focus on educating and not attracting.
Track in-app behaviour
Once your customer has completed the first task, send a triggered e-mail or incentivize them. If your customer suddenly leaves the app, send them a reminder saying, “Catch up where you left at..” This is only possible if customer behaviour is tracked. This analysis will also help you in cutting off those features which the customer doesn’t uses.
Measure progress
Measuring progress is an excellent way to remind the customers where they are at. This also helps them to know that there are features which are yet to be explored. Progress should be visible to the customers in the form of percentage, sliders or progress bars.
Don’t stop, but don’t burden.
Checklists should never stop. But they shouldn’t be burdening too. An effective Onboarding experience gradually exposes users to new and helpful product features. This is very commonly seen in photo editing apps like Lightroom where video tutorials of new/untried features are always available. They even provide video tutorials about how to get the best editing out of the app. Such services makes the experience customized and interactive, keeping the user engagement up.
So whether you are a new product or an existing one, it is never too late to check up on your checklists and make sure they are generating user engagement.